Up to this point, I've always just called this Zelda WIP, because I didn't have a name for it, and as I was the only one who knew about it, didn't particularly need one. I want it to have a fitting name, that sounds like it could be a real Zelda game... not something unfitting like Ages of Doom or Land of Darkness. However, I'm still working things out and don't have a name yet, but wanted to post this. So, in the meantime, I'm adopting the title Four Swords Gaiden.
I've done very little actual coding on it (just movement, item use, heart display, that kind of thing), as I like to have everything else finished before moving on to that stage. I've done a fair amount of sprite work, but nothing I'm so committed to that it's unchangeable. What I'm trying to say is, at this point things are still very flexible. What I do have, however, is a rough story. It takes place in relation to other Zelda games, but it purposely couldn't possibly fit in the timeline. Maybe it's on an alternate timeline, who knows... what matters is the story being told, not how it fits into the grand scheme of things.
In summary, Link and his friend Dak live in a quiet jungle village. They get lost, find some crumbling ancient ruins, and accidentally free Ganon. Ganon kidnaps Dak, turns Link to stone, and vanishes. An unknown amount of time later, a winged girl finds Link, restores him, and joins him in his search for Ganon. Link manages to get his hands on the Harp of Ages (wow, this is REALLY summarizing!), and uses it to move between his time period and Ganon's dark future, looking for his friend.
The long version is... longer. It's also pretty rough, and in a point-a-to-point-b format, so in every area there would be tons of optional stuff that I just haven't covered yet, as I'm not done writing the scenario. I've also just given a brief overview (solve puzzles, beat mini-boss, get item, solve item puzzles, beat boss) of the three dungeons I've covered thus far, because I'm not much of a level designer. I don't know what will happen if I put this much text here, so if it becomes a problem I'll put it elsewhere and link to it. Please, refrain from quoting this post.
Again, this is a rough draft, it omits a few details, and there are bits of story I plan on working into each area. A lot of things are liable to change, possibly pending suggestions, and I can answer any questions you have/elaborate on any part of it.
Forgotten Valley
The scene opens on [Mikan], a small jungle village full of houses made
from giant hollowed-out gourds and simple wooden huts. Link and his
friend, Dak, are awoken by Dola, a woman who serves as a mother
figure to the two of them. Dola tells them that she knows that she
can't stop them from visiting the graveyard, but that they should
at least be careful on the rickety old rope bridge spanning the
canyon that they'll have to cross to get there. Link and Dak both
nod, get out of bed, and run through the village gate to the east.
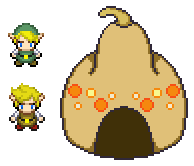
(Link and Dak by a conceptual gourd house)
Dola and Hanel, her husband, look on as they leave.
Hanel: I worry about that boy. He visits that grave almost every day...
Dola: Everyone has missed Yura, especially her son... but I wouldn't worry about him.
Hanel: Oh? Why's that?
Dola: He has that young man to look after him now.
Hanel: Ah! You're right, of course. They've been like brothers ever since that incident...
As Link and Dak are crossing the rope bridge over the canyon, one
of the ropes snaps, and they plummet to the jungle below. When Dak
regains consciousness, he finds himself at the edge of a river, with Link
still unconscious a few feet away. A short time later, they go off to
explore the new area of jungle, and before too long they find some
ancient, crumbling ruins, at the heart of which is a large chamber. In
the chamber is a pedestal with a sword stuck in it. When Dak tries to
pull the sword from its resting place, it breaks, releasing Ganon, who
had been sealed inside. Ganon mistakes Dak for the legendary hero who
sealed him in the sword, and grabs him by the throat. Link picks up the
broken Four Sword, but before he can do anything else Ganon turns him to
stone and vanishes with Dak.
Day turns to night, seasons pass, vines slowly creep up the crumbling walls.
The increased passage of time stops as a winged girl walks into the chamber
and begins examining the Link statue. After a few seconds she chants a spell
that turns him back to normal, much to her surprise. She introduces herself
as Kei, and tells Link that she is looking for her grandfather, who has gone
missing. The spell she used was created by her grandfather, a geomancer, and
normally causes stone statues to recount what they've seen. Since Link wasn't
actually a statue, the spell somehow un-stoned him. Kei is angry to learn that
Link was involved in Ganon's release, as he has ruled Hyrule since long before
she was born, and that she thinks he's related to her grandfather's disappearance.
She decides that since Link is looking for Ganon he may be useful, and says that
she'll follow him around looking for clues as to where her grandfather went. She
says that she'll be watching above, and flies up into the sky.

(You finally gain control of Link, with these in his inventory. In case you didn't realize it based on Ganon's actions, yes, the one in green was Dak)
Common Tunic
"This is a regular, run-of-the-mill tunic. It's comfortable,
if not very fashionable."
Broken Sword
"This sword once sealed the evil Ganon. Though it lacks a
tip, the blade is still sharp enough to be used. Equip it
and press SPACE to attack your enemies!"
As you gain control of Link, make your way through the jungle to the
graveyard, then into [Mikan] Village, which is completely empty. Exit
through the southern gate to the [Western Wood]. To the east is a
large broken statue, and to the south is a shimenawa (sacred rope),
both of which are blocking their respective paths.
Kei: This is some kind of sacred rope.. I think it means that the area
past here is of religious importance. Or, we're already in the closed
area, and that rope is to keep people out. Either way, we shouldn't
cross it.
To the west is the [Shrine of Ages], built into a mountainside and
surrounded with a tall wall. Within the wall are several buildings,
a bell tower, and the inner sanctum, which is inside the mountain.
Talking to the monks, you learn that the shrine is dedicated to the
protection of the Harp of Ages, which will allow its user to travel
through time. However, the High Priestess, who has the harp, has sealed
herself in the bell tower,and the only other key is in the inner sanctum.
None of the monks are willing to get it, though, as the inner sanctum
has been overcome with evil, which is why the priestess sealed herself
in the tower to begin with. Venturing into the sanctum, you find simple
puzzles,weak enemies, and eventually two minibosses- one which rewards
you with the [Cane of Eradi], and one which requires the [Cane of Eradi] to
defeat that gives you the Bell Tower Key and opens a portal to the surface.
[Cane of Eradi]
"A mystical cane used to lift heavy objects. Equip it
and press C to lift objects with blue orbs on them."
Climbing to the top of the bell tower, you find not the High Priestess, but
[Kokiru], a monstrous hermit crab living in the bells.
Boss - [Kokiru]
Huge hermit crab that lives in the belfry of the [Shrine of Ages].
It hides under one of three large bells, and the bells are mixed
up like a shell game. You use the [Cane of Eradi] to lift the correct
bell, then attack the exposed gem on [Kokiru]'s body. More bells
are added throughout the battle. If you overturn the wrong bell,
a colony of Keese will attack you.
After defeating [Kokiru], Nayru, the High Priestess, is freed from the
gem that was [Kokiru]'s weak point, and explains that she had locked herself
in the tower in order to keep [Kokiru] from getting out. She goes on to
say that while her people have been guarding the Harp of Ages for...
ages, she doesn't actually have it, as it has been stolen by her childhood
friend and rival, the pirate Din. Kei volunteers the two of you to retrieve
it, and Nayru says that she'll have the shimenawa removed so that you can
go to Martha's Bay in the south, which is Din's base of operations.
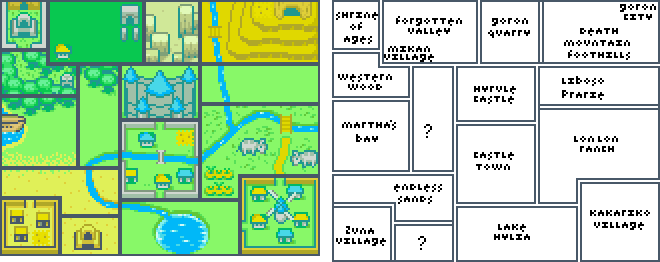
(The map as it appears in the past. I know, it's not done yet. In the future, you can expect the rivers to be dried up, the grass dead, things destroyed, etc.)
In Martha's Bay, you're ambushed by the pirates, who take you to their
hideout and present you to their leader, Din, who will only talk to you if
you pass a test to prove your worth. The test consists of fighting, sneaking
past guards, and hitting targets. Impressed with your skills, Din will give
you the Initiates' Badge, and will listen to what you want.
Initiates' Badge
"This badge is a certificate that only those who pass the
Pirate's Exam are given. Equip it and press C to show it off."
When Din hears that you were sent by Nayru to get the Harp of Ages
back, she'll laugh and have you thrown out. Use the sneaking skills you
learned earlier to get back to Din's room and steal the harp. Din will
catch you, but will be so impressed that she will let you leave with it.
Harp of Ages
"Long guarded by Nayru's people, this magical instrument
allows its user to travel through time! Equip it and press C
to play the Song of Time."
Return to Nayru, and she'll explain that since the harp can't currently
be used at its full power, you'll have to use it within a specially-designed
room in the shrine to travel through time. Go to the room indicated by
Nayru and play the harp to go back to the past. When you leave the room,
you'll find carpenters in the process of building the shrine, with several
blocks that can be lifted with the [Cane of Eradi] sitting about. One of the
carpenters will mistake you for a monk, and give you the blueprints to the
time chamber, which they no longer need.
Shrine Blueprint
"This is a blueprint detailing how to make a Time Chamber.
Equip it and press C to show it off."
The shimenawa will be across the path to the south again, and the statue
will still block the path to the east, but it will now be in better condition,
with a blue orb embedded in it. If you move to go over there, though, Kei
will remind you that you may still be in time to stop Ganon. When you talk
to the people in [Mikan] Village, they'll be surprised that you're already
awake, as Dola just went to wake you up. Kei will tell you that you have to
find a way to keep Link and Dak from reaching the ruins. Go to the bridge,
and Kei will tell you to cut the ropes, so that the bridge will be unusable
before they even get there. Right as you begin slashing at the bridge,
however, Kei sees Link and Dak, and makes you hide in a bush. As they
cross the bridge, the rope you had been slashing snaps and the bridge
collapses, dropping them into the valley below.
Kei: I wonder if the rope wouldn't have snapped if you hadn't done that...
Link: (...)
Kei: What, you think Ganon being released is MY fault now?
Link: (sweatdrop)
Kei: Anyway, there may still be time! Let's go!
Link: (...)
Kei: Oh, right, the bridge. Well, I'll go, then. You go tell your friends what happened!
Return to the village and talk to Dola. She'll be shocked and worried,
of course, but just then Kei comes back.. with news that Dak has been
kidnapped by Ganon. Dola will recognize the name, and show you a book
containing the legend of Ganon, King of Darkness. Afterward, she'll give
you a gift that she had been helping Dak make, a tunic made from a design
he had found in his mother's belongings. Hanel gives you a wooden shield.
Dola: If anyone can bring Dak back, Link, it's you!
Hanel: Link, you know that it's dangerous to go alone. Take this.
Hero's Tunic
"Based on the legends of ancient heroes, this tunic was made
by your friend Dak as a gift before he was kidnapped."
Wooden Shield
"A simple shield that will burn if it comes in contact with
fire. Equip it and press C to block enemy attacks."

(Link is finally ready to set out on his adventure!)
As you enter the [Western Woods], you'll be accosted by Tingle, who is mapping the area. He's shocked that he managed to find two forest fairies, and gives you a map of the area. He then inflates his balloon, telling you to visit him if you're ever in Castle Town as he floats off. Use the [Cane of Eradi] to leave the [Western Woods] by moving the statue blocking the path to the east, and you'll enter... a place I haven't named yet. Make your way south to Castle Town, which is vibrant and full of life.
Hyrule Castle Town
Access to Hyrule Castle is denied, and Kei remarks that it doesn't seem as if Ganon has attacked yet. If you try to leave, Kei will say that she wants to explore more, as she's never seen a big city. The black smith's shop is closed, saying he's out on a job. Other locations in town include the residential district, the library, the school, the cafe, the bakery, the post office, the real estate broker, Tingle's shop, the game center, the inn, the doctor's office, and Beedle's item shop. Beedle has the following items for sale. I'm going to list both how Beedle markets them, and how they appear in your inventory.
Good Wood (out of stock)
"Oooohhh!! This is a good piece of wood! The sides are
metal, and it has a handle on the back!!"
Traditional Shield
"A large wooden shield with metal fittings, made in the
traditional fashion. Equip it and press C to block enemy
attacks."
Good Bottle (100 Rupees)
"Oooohhh!! This is a good bottle! It holds a lot, and
has a cork stopper for your convenience! Yes, yours!!"
Empty Bottle
"This is an empty glass bottle. Equip it and press C
to put something inside."
Pointy Thing (10 Rupees for bundle of 10, 30 for 30)
"Oooohhh!! These pointy things have metal heads, and
tail feathers! Very aerodynamic!!"
(without quiver)
"Oh? You don't have a pointy thing holder! You need one!!"
(There is no inventory entry for arrows)
Fun Ball (20 Rupees for bundle of 10, 60 for 30)
"Oooohhh!! These are great toys for children! Just keep
them away from fire! Boom!!"
(without bomb bag)
"Oh? You don't have a fun ball holder! You need one!!"
Bombs
"You need a license to use these dangerous explosives.
Equip them and press C to light one."
Good Thing (60 Rupees)
"Oooohhh!! This thing is good! Girls think its shape is
cute! Impress the girls!!"
"You got a Piece of Heart! Collect (#) more to increase
your life by one!"
You'll eventually find a big, empty plot of land in the north-east part of town, with Gorman standing in the middle of it. It's the brown patch shown on the map.
Gorman: "A MACHOP is growling while stomping the ground flat!" ...Ahem! Forget
you just heard that. Vocal exercises, you see.
Gorman fast-talks Link into buying the plot of land, then is enraged to learn that Link doesn't have enough Rupees. He gives Link his bill, and says to try getting a job at the temp agency. You can't actually tell how much you owe from the bill.
Gorman's Bill
"This is the bill for a plot of land you bought from
Gorman. It has ink spilled on all the important parts!"
At the temp agency, you can choose to work at several local businesses - Mama's Bakery, Tulma's Cafe, Beedle's Bargain Barrel, White Rabbit Courier Service, Castle Town Smithy, and Castle Town Library. At the moment, Castle Town Smithy is closed. Working the jobs takes the form of minigames. Once you've earned enough Rupees, Kei will suggest that you go back to Gorman, and when you do, she'll bargain and play hardball, eventually convincing him to let you pay the rest off later. Gorman will lament about the real estate market's decline being bad enough without having to make pricing plans, but gives you the Castle Town Land Deed and sulks back to his office.
Castle Town Land Deed
"This is the deed to a plot of land in a prime location
in Castle Town. Equip it and press C to show it off."
As you return to the center of town, the building team from the [Shrine of Ages] will enter town through the west gate. They thank Smithy for his time and ask if he'd like to join them at Tulma's Cafe. He'll say that he really must get back to work, and return to his shop. If you go to Tulma's, you'll find the carpenters celebrating, and they'll ignore you. If you try to leave town Kei will suggest that you have Smithy look at your broken sword, so do that. Smithy will remark on how old the sword is, and say that he isn't surprised that it got broken. He'll then notice that the sword has magical properties, and ask for it to be left with him to examine. He'll give you the Iron Sword as collateral.
Iron Sword
"This sword was forged by Smithy. It has a long reach,
but is a little unwieldy. Equip it and press SPACE to
attack your enemies!"
At this point you'll be able to leave through the east gate to Lon Lon Ranch, but you'll need to go through there later and nothing will have changed, so I'll cover it then. There are guards at the gate to the south that won't allow you to pass. Go to Tulma's Cafe and you'll find the atmosphere much more somber. Talking to the builders will reveal that they don't have any more jobs lined up, and that they don't know what to do. They'll tell you that if you find anything for them to do, to take it to their boss, Mutoh. If you show him the Shrine Blueprint first, he'll ask where they should build it. If you show him the Hyrule Castle Land Deed first, he'll ask what they should build there. Once you've shown him both, he'll agree to build the shrine.
Mutoh: Your monk buddies were EXTRA generous with the Rupees, and my lazy workers
didn't want to haul the leftover materials the rest of the way back to Kakariko anyway.
They'll immediately go and start work on the shrine. Kei suggests that you go exploring. In Lon Lon Ranch you'll find farmers tending crops, Anju trying to catch her cuccos, and Talon overseeing the cows. To the south, the gates to Kakariko are closed, and to the north, Malon is watering Epona in a river, next to a broken bridge.
Malon: I know it's a cliche, but it seems that one of the cows has broken the bridge! I guess
we'll have to wait for the Kakariko Building Company to get back from their job in the west...
Return fo Castle Town, and Mutoh will upgrade your Land Deed to a Shrine Deed, then leave with his builders.
Castle Town Shrine Deed
"This is the deed to the [Shrine of Ages] in Castle
Town. Equip it and press C to show it off."
The shrine is an perfect copy of the Time Chamber, so Kei suggests going back... to the future.
Kei: As fun as it's been playing around in the past, we haven't found any leads.
I think we should return to the present to look for clues... it's easier to look at
where someone HAS been than to try to predict where they WILL be.
Enter the shrine and use the Harp of Ages to travel to the future. Leaving the shrine, you'll find every other building destroyed or at least in some state of disrepair, and monsters all over the place. Through the west gate you'll encounter more monsters, thieves, and a cave containing a puzzle and a Piece of Heart. Through the east gate you'll find the Lon Lon Wastes, also full of monsters and unpleasantness. The bridge to the north is still broken, but you can get into the Kakariko Ruins to the south.
Kakariko Ruins
When you enter the ruins, you'll be challenged to a game of hide-and-seek with some Ghinis. To find them you'll have to move stones, destroy wooden beams and old furniture, and use the [Cane of Eradi] to lift certain objects. When you find a Ghini, it will attack you, and when you defeat it it will fly off whining. Once you've found them all, you'll be warped to the center of the ruins, where the Ghinis will combine into one big Ghini. Kei will come down to tell you that unless you're able to hit its eye, you'll have a lot of trouble winning the fight.
Mini-Boss - [Giant Ghini]
The giant Ghini will attack you either by licking, or by levitating crumbling
stonework and trying to crush you with it. It's vulnerable to sword attacks,
but that puts you in tongue range. When it tries to crush you with stones,
sometimes a piece with a blue orb in it will break off. Use the [Cane of Eradi]
to hit the giant Ghini in the eye with three of these to defeat it.
The giant Ghini will let out a chittering laugh and retreat into the crumbling remains of the windmill that once stood in the center of the town. A man will come out of hiding and ask if you've defeated all of the Ghinis, saying that he's been trying to rebuild Kakariko for a long time, but that the Ghinis have prevented it. Kei explains that the big Ghini hid in the windmill, and the man says that it probably went down into the underground storage area, which had originally been a temple. He goes on to say that an brave old man had gone in to eradicate the Ghinis, but that he hadn't been seen since. Kei thinks that the old man might be her grandfather, so decides that you'll be going in.
(The dungeon is filled with Ghinis, Stalfos, Armos statues that get possessed by Ghinis, and Tektites.You evenually fight a mini-boss for the Bow, solve some arrow-related puzzles, then fight the boss, [Oeilga], a boulder that has been possessed by the giant Ghini. The old man turns out to be someone who wanted to help rebuild Kakariko, and when you return to the surface, there are people repairing the buildings. Kei says that you didn't find any clues in the future after all, so you return to the past. Kei remembers that you left your sword with Smithy, so go back to him. He'll tell you that he can reforge it, but he'll need the tip and ore from the Goron Quarry. Kei tells Link that she didn't see the tip in the jungle ruins when she went back there, but that they can worry about that later. Smithy will give you the broken sword, and take back the iron sword. When you try to leave town, Gorman will demand the rest of what you owe him, if you haven't paid him off yet. If you have enough, he'll take it and leave. If you don't, he'll tell you to make money at the game center or to sell things to Beedle, who now carries a boomerang in his shop. If you got all of the treasure in the Lon Lon Wastes and Kakariko Ruins, you'll have more thn enough to pay him. Make your way through the Liboso Prairie and you'll find a Goron, who tells you that the entrance to the Goron Quarry has been blocked by huge boulders, too big for even Gorons to break. Talking to other Gorons, you'll learn that the quarry was sealed by some kind of big blue monster, and that it locked someone inside. Upon climbing Death Mountain you'll find Gorman on another plot of land. He'll offer to sell it to you, but won't be forceful about it. Buy the land, then go into Goron City.)
Goron Quarry and Biggoron's Big Belly
"That Biggoron... of course he has a stomach ache, he always eats his food whole!"
Speak to the Goron Elder, and he'll tell you that the only one able to
move rocks that big is Biggoron. Unfortunately, Biggoron has a stomach
ache, and a batch of Goron stomach medicine would take years to make.
There's other stuff to do in Goron City, but it's all optional. Leave the city,
and you'll find Mutoh by the plot of land. He says that he heard from Gorman
that you had bought it, and asks if you want anything built. He WILL charge
for his services this time. Show him the blueprint and go back into the city,
and when you come back out the shrine will be finished. Upon arriving in the
future, you discover the route to the Goron Quarry passable; however, Goron
City is closed off, and Death Mountain is covered in Dodongos. Inside the
quarry's mine, you find enemies and puzzles that have already been solved.
Eventually, you find a Magic Lantern that allows you to light torches and solve
a puzzle leading to a miniboss.
Magic Lantern
"This lantern can burn forever without ever running out
of fuel, though nobody knows whether it's the lantern or the
fire that's magic. Equip it and press C to ignite nearby objects."
In order to defeat it, you have to make it eat the lantern, then lure it into Bomb
Flowers, at which point it will take damage and spit the lantern out. When
you defeat it, the lantern is lost with it, but you are rewarded with the [Power
Robe] and a portal back to the surface.
[Power Robe]
"This robe was a gift from the Gorons to the Hylians in
times past. Equip it and press C to turn into a stone statue."
Using the [Power Robe], you're able to get into Goron City, where you find
the few surviving Gorons and a huge batch of Goron stomach medicine.
Goron Medicine
"This is a super-sized dosage of Goron stomach medicine,
in a super-sized squeeze bottle. As tempting as squirting
it may seem, it would be best not to waste any."
Returning to the past, you give the stomach medicine to Biggoron, who asks
you to bring him a big tasty rock to eat, as the medicine's directions say
to take it with food, and says he'll take a nap until you return. Use the
[Power Robe], and Biggoron will smell the rock (you) in front of him, and eat
both you and the medicine bottle whole. Inside Biggoron's stomach, you get
the medicine back, and are now able to squirt it out.
Goron Medicine
"This is a super-sized dosage of Goron stomach medicine,
in a super-sized squeeze bottle. Equip it and press C to
squirt the medicine out."
The medicine can heal inflamed 'doors' and 'switches', kill enemies, and is
needed to defeat the mini-boss, at which point it will run out. All that remains
in the mini-bossroom is a 'switch', which when attacked will cause Biggoron
to cough you up. Biggoron, feeling better, will destroy the rocks blocking the
path to the quarry, and you'll finally be able to enter the bulk of the dungeon,
which is filled with puzzles that require the [Power Robe] to solve. You'll
eventually get the key to the boss room.
Boss - Demi-Octo
Gigantic red Octorok that spits out normal-sized Octoroks.
When it begins spinning around the room, put yourself in its
path and equip the [Power Robe], turning to stone. When
Demi-Octo slams into you, the impact will knock it out,
exposing the blue crystal on the bottom of it's tongue.
Attack the crystal until Demi-Octo wakes up, and repeat
the process. After doing this a few times, Demi-Octo
will launch it's second phase, which I haven't decided
on yet.
After defeating the boss, you find that the person Ganon locked in the
mine was actually Ruka, princess of the Zora people, who thanks you for
saving her and gives you the Zora's Emblem. She says that she will find
a way to repay you if you're ever in the Zora's Domain area, and leaves.
Zora's Emblem
"A badge with the symbol of the Zora people. This shows
your connection to the Zora royal family! Equip it and press
C to show it off."
That's as far as I've written. I've planned far, far ahead, and there's a lot that I have yet to work into here, but I want to get the scenario hammered out first. I think I forgot to mention, but Kei will always be flying above you, only coming down for interactions, kind of like fairies hiding under Link's cap, Ezlo
being Link's cap, or Midna hiding in Link's shadow. Princess Zelda IS involved, but her introduction is one of those non-walkthrough details that I have yet to work into the scenario.
So... thoughts?

